Posts

Showing posts with the label How-to

How to prevent W10 Game Bar popup when launching Apps/Desktops from Citrix Receiver

When you launching Citrix published applications or desktops from a Windows 10 operating system, then a green popup windows briefly appears prompting to press Win + G for the game bar or for the search bar. The DVR function is enabled by default in Windows 10. How to prevent this popup on the client? Open Registry Editor (regedit.exe) Go to HKEY_CURRENT_USER\System\GameConfigStore Set the value of DWORD " GameDVR_Enabled " to 0 Go to HKEY_LOCAL_MACHINE\SOFTWARE\Policies\Microsoft\Windows Create key " GameDVR " Create 32bit-DWORD called " AllowGameDVR " and set the value to 0 This fix the Win + G Popup when launching Citrix apps/desktops from a Windows 10 operating system with the latest patches.
How to fix Office 2016 Click-to-run download issue - Error code: 30015-1007 (123)

02.10.2015: The new version 16.0.6227.6350 has no longer this problem. Update your Office Deployment Toolkit and have fun. ;-) I ran into a issue tonight with the new Office Deployment Toolkit with support for Office 2016. The workaround is very simple, but you must first get it. :-) The bug is in version 16.0.6216.6351 of the tool. What is the problem? The Office Deployment Tool (version 16.0.6216.6351) gives the error code 30015-1007 (123) because it can not automatically detect where to save the setup files to. How to fix this issue? Create a new folder called " Office " in the same directory as setup.exe Inside this folder, you must create another folder called " Data " Inside the "Data" folder you must create a file " v32.cab " or for the 64-bit version of Office " v64.cab " (example: \Office\data\v32.cab ) Start the download again an it will works (example: setup.exe /download Download.xml ) I hope the office tea...

ConfigMgr 2007 - Policy and ci_sdmpackages table large and growing fast

How to eliminate slack space in the Microsoft ConfigMgr 2007 database? I have a customer with a big Microsoft Configuration Manager 2007 database (more than 25 GB). The table Policy and the ci_sdmpackages table were unusually large. I found that the disk space consumption comes from a FEP 2010 bug... I can fix this issue with the following SQL-Commands. Please make a backup of your database before you start with the execution of the commands and look for enough disk space (minimum double of database size)! Good luck! First SQL command: DELETE FROM Policy WHERE PolicyID NOT IN (SELECT PolicyID FROM PolicyAssignment WHERE PADBID IN (SELECT PADBID FROM ResPolicyMap)) AND PolicyID NOT IN (SELECT ModelName FROM CI_ConfigurationItems) AND PolicyID LIKE '%SUM_%' Second SQL command: dbcc cleantable ('(Your DB Name)','ci_sdmpackages') GO alter index CI_SDMPackages_AK on ci_sdmpackages reorganize with (lob_compaction=ON) GO alter index CI_SDMPackages_AK2 ...

SCCM 2012 Software Center returned error code 0x0041013 (-2147217389)

After an update from SCCM 2007 client to SCCM 2012 client, there is sometimes show the error "Loading Software Center returned error code 0x80041013 (-2147217389)." in Software Center. This even though the client was successfully installed. I think this error is because not all parts of the old SCCM clients have been properly removed. You can fix this issue with the following steps: Open registry Go to  HKEY_CLASSES_ROOT\CLSID\{555B0C3E-41BB-4B8A-A8AE-8A9BEE761BDF}\InProcServer32 Check the value for Default is C:\WINDOWS\CCM\ccmcisdk.dll (if not, change the value) Go to  HKEY_CLASSES_ROOT\Wow6432Node\CLSID\{555B0C3E-41BB-4B8A-A8AE-8A9BEE761BDF}\InProcServer32 Delete the value in Default (value is C:\Windows\SysWOW64\CCM\dcmsdk.dll) You can launch the software center again and you can see the applications without the error message.

How to publish a message on login page of Citrix NetScaler

If you want displayed a message on the login page on the NetScaler, you must following this steps. Connect to NetScaler with WinSCP or FileZilla Go to the File " index.html " (Path -> " /var/vpn/vpn ") Make a backup from the file for your safety! ;-) Edit the file and change the red lines (see the example) Save the file Reload the login page and the message will be displayed Example <!-- Error message box -->      <tr>       <td align="center">            <table class="CTXMSAM_LogonFont">                <tr id="errorMessageRow">                     <td class="glowBoxLeft">&nbsp;</td>                     <td class="loginTableMidWidth">                   ...

SCCM Console - EventID 10009 REPLACEPROVIDERMACHINE

Image
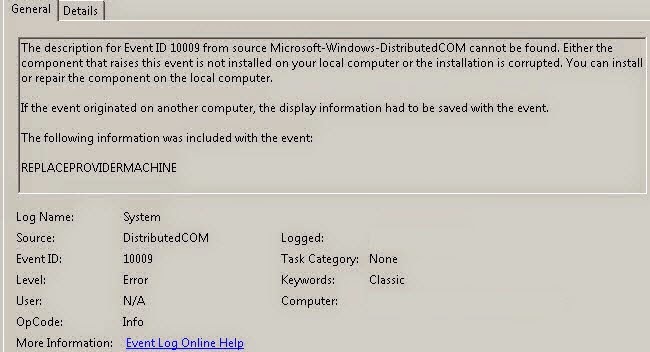
I have the following message in the event log and i can't start the Microsoft System Center Configuration Manager Console 2007. I'm fix the error with this steps: Running wbemtest.exe with admin rights Click Connect, type \\siteserver\root\sms  and then click Login Click Enum Classes, click Recursive and then click OK. In the Query Result list, double-click SMS_ProviderLocation Click Instances and then double-click the line that contains the target site code For example, SMS_ProviderLocation.SiteCode="xxx" In the Properties section, locate the NamespacePath line. You may have to double-click this line to see the whole line. Copy the NamespacePath value to the clipboard. For example, copy the following value: \\server_name\root\sms\site_xxx You can find more information at this link -> https://support2.microsoft.com/kb/317872/en-us

Unlocking Microsoft SCCM 2012 R2 Objects

When you will edit a Task Sequenz or other entries in Microsoft System Center Configuration Manager 2012 R2 and the message "Cannot edit the object, which is in use by 'username' at Site 'configmgr site'." pop up, you can fix this with the following steps. Open Microsoft SQL Server with the SCCM  instance Make a SQL Query with the following statement select * from SEDO_LockState where LockStateID <> 0 Copy the LockID from the entrie you will unlock Make a second SQL query with the following statement DELETE from SEDO_LockState where LockID = '< copied  LockID from the previous query>' After this steps you can edit the locked entries again in the SCCM console.

How to give a user rights for NetScaler Reporting tab

Image
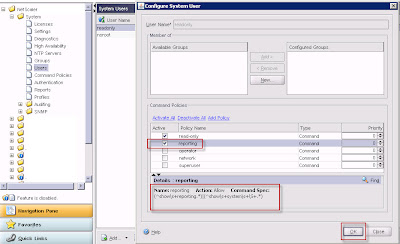
When you create a NetScaler user with read only rights, that user can't see the Reporting tab. You have the error message: Error retrieving the data source. Return code = 2138. Error message = Not authorized to execute this command. You can create this rights for the user with the following points. Open NetScaler webinterface Log in with nsroot or a user with root rights Go to Configuration tab Open folder System Go to Command Policies Generate a new one with the Add -Button Give a name (Example: Reporting) Type the following text in the Command Spec ->  (^show\s+reporting.*)|(^show\s+system\s+\S+.*) Click Create Go to Users Open the user do you want give the reporting access Actived the reporting policy Click OK

How to fix the check box on RDWeb 2012 for use private computer

Image
It is hard when you use the RDWeb interface internally only and you must activated the checkbox " I am using a private computer that complies with my organization's security policy. " each time. Do you want to activated the checkbox by default, you must make the following points. Go to C:\Windows\Web\RDWeb\Pages\en-US or other language Open the file "Default.aspx" with admin rights Go to line 32 with the content " public bool bShowPublicCheckBox = false, bPrivateMode = false, bRTL = false; " Change the value from bPrivateMode from false to true Save Example:  public bool bShowPublicCheckBox = false, bPrivateMode = true, bRTL = false;

How to launch an external program inside an App-V 5.0 environment

Image
In the old App-V versions, you can make this with the command line parameter: sfttray.exe /exe App1.exe OSDFilePath\OSDFile.osd With App-V 5.0, you can make this with the the command line switch /appvve that apparently can be added to any executable to launch it inside a virtual environment. Example Start Application "App1.exe" in the virtual environment of the PackageID "714ccb17-20a9-4fc3-b635-146cba322ac0" with the VersionID "72e97ec0-165e-4180-870c-ed0e13125ab5". Please note the "_" between PackageID and VersionID! C:\App1.exe /appvve:714ccb17-20a9-4fc3-b635-146cba322ac0 _ 72e97ec0-165e-4180-870c-ed0e13125ab5 You can find the PackageID and the VersionID with the following PowerShell command: Open Powershell.exe (with admin rights) Import-Module AppVClient Get-AppVClientPackage -Name VApp1 You can find the PackageID (Example 714ccb17-20a9-4fc3-b635-146cba322ac0) And the VersionID (Example 72e97ec0-165e-4180-870c-ed0e13125ab5) ...

How to publish the remote desktop session servers to RDWeb under RDS 2012

You can find the setting for publishing the Remote Desktop Session Server Desktop under: Server Manager Remote Desktop Services Collections CollectionName Tasks Edit Properties General tab But you can not change this setting in this wizard! Under Windows Server 2012 RDS you can only publish Desktops or RemoteApps, but not both. :-( If you would like to bypass this limitation for session collections only, you may consider changing the following registry value on your Remote Desktop Connection Broker (RDCB): Open the Registry-Editor Go to the following path:  HKLM\SOFTWARE\Microsoft\Windows NT\CurrentVersion\Terminal Server\CentralPublishedResources\PublishedFarms\<collection>\RemoteDesktops\<collection> Open the REG_DWORD " ShowInPortal " Change the value data from 0 to 1 After this change you can see the desktop in RDWeb. :-)

How to set custom RDP Settings in Windows Server 2012

Image
I can't find any place to set the Custom RDP Settings on my Windows Server 2012 Connection Broker. I also looked in the wrong place, because the settings are "only" set via PowerShell and I look in the GUI. Open PowerShell with admin rights Import the remote desktop service module ->  Import-Module RemoteDesktopService Type the following command: Set-RDSessionCollectionConfiguration -CollectionName XXXX -CustomRdpProperty "authentication level:i:0 pre-authentication server address:s:https://XXXX.XXXX.XXX/rdweb require pre-authentication:i:1" The example is for the configuration of RDS in connection with TMG. Conclusion : Not in the GUI but in PowerShell! :-)

How to reset the password from Citrix license console

From current occasion I'm writing this post... I hope citrix takes it not angry with me. :-) Which of us is not familiar with this situation? Quickly install and configure and later the password is forgotten. In order to reset the password of the citrix license console you must perform the following steps. Open the server.xml file with notepad.exe (You can find the file under "%ProgramFiles%\Citrix\Licensing\LS\conf".) Search the the entry... <user firstName="System" id="admin" lastName="Administrator" password="(ENC-01)XXXXXXXXXXXXXXXXXXXXXXX" passwordExpired="false" privileges="admin"/>; You must erase the contents between the double quotes after " password="" " Enter a plaintext passwort (Example: " password=TEST ") Now change the passwordExpired value from " false " to " true " Save the file server.xml on the same location Restart the Citrix li...

Fix Error 30105 Citrix servers do not trust the server message in XenDesktop 5.5

When you login to your web interface and launch a new desktop, it might not launch and you might get this error in the application event log on the server: Source: Citrix Web Interface Event ID: 30105   The Citrix servers do not trust the server. This message was reported from the XML Service at address http://localhost/scripts/wpnbr.dll [com.citrix.xml.NFuseProtocol.RequestAddress].   [Unique Log ID: xxxxxxxx] In XenDesktop 5.0 and 5.5 can you fix the problem with the follow steps: Oper PowerShell with admin rights Import all citrix snap-ins with this command asnp citrix.* Add-PSSnapin citrix.* You can enable the XML Trust with this command Set-BrokerSite -TrustRequestsSentToTheXmlServicePort $true After this 3 steps the lauch it should come right up and there are no more errors in the log. How to Add XenDesktop Cmdlets into Powershell -> Video

How to enable Secure ICA on XenDesktop 5.5

Image
By default, XenDesktop disables SecureICA. If you enable it, the default encryption level is 128-bit. You can configure the level using the XenDesktop SDK or with this three steps... In Desktop Studio, select the Assignments node in the left pane, and select the desktop group whose communications you want to secure. Click Edit desktop group . On the End user settings page, select Enable Secure ICA . This is solved differently than in XenApp . In XenApp, it ' s controlled via policy.

How to change App-V Management Server Service to run as a Service Account

By default the App-V Management Server service is configured to run as the Network Service and you can not simply change this . If you want to change the service account, because the company policy or security dictate this , you find help in the following steps . 1. Create the service account in your Active Directory 2. Add this account to the administrator group used for the App-V Administrators 3. Open the services.msc, then double-click on Application Virtualization Management Server 4. Click on the Log on tab and change the NT Authority\Network Service to the service account that you created in Step 1 and enter the password. Click OK. 5. Click OK again to acknowledge the Services dialog box indicating that the new logon will not be in effect until the service is restarted. 6. You must add the service account to Logon as A Service rights in the Local Security Policy  7. Open the command prompt and enter the following commands: setspn -A SoftGrid/<F...

How to create a local ISO Storage Repository on Citrix XenServer

Who does n't  know the problem! The hard work with CDs or DVDs. The solution - > use ISO library . If this can't be placed centrally on the network , then you can create a local ISO library on XenServer .   The following is a short guide : Create the directory "/ var / opt/ xen / iso_library / ", this can be created with this command: mkdir - p /var/opt/xen/iso_library The ISO storage repository is created as follows : xe sr - create name -label =" ISORepository" type=iso device- config: location=/var/opt/xen/iso_library / device- config: legacy_mode=true content-type=iso Use WinSCP or other tool to copy the ISO files in the directory iso_library Now, you can selected ISO on Citrix XenCenter at drop-down "DVD Drive" Have fun!