Posts

Showing posts from 2013

Cannot complete call transfer in Lync Server 2013

Image
I'm implementing a new Microsoft Lync 2013 deployment in my company. I had a standard Lync call forwarding problem at the same SIP trunk deployment was used in the old Lync 2010 deployment. The problem was that I could not forward any calls to my mobile phone or other phones. The Lync client show the message "Cannot complete the transfer." Only from Lync Client to Lync Client works perfectly. I looked at the old environment and found the solution to the problem. I had the same problem already and the last time I had solved it (but unfortunately not documented ... but now it's documented :-) ). The fix was very simple. You must make the following changes in your environment. Open the Lync 2013 Powershell (with admin rights) Get-CsTrunkConfiguration If the setting of EnableReferSupport already has the value FALSE, then you have another problem that can not solved with my instructions! Backup the config Set-CsTrunkConfiguration -EnableReferSupport $F

How to change the SCUP database to a shared database (multiple users)

Microsoft System Center Updates Publisher (SCUP) 2011 does not store his database file centrally for all users. SCUP creates a separate file for each user in his profile ("C:\Users\<UserName>\AppData\Local\Microsoft\System Center Updates Publisher 2011\5.00.1727.0000\"). Funny, because a central database file is in the most cases very useful. With the following steps you can change this (mistake): Close the SCUP console Open the Scup2011.exe.config in editor (run the editor as admin) Add the following lines to the config file <applicationSettings>        <Scup.Properties.Settings>            <setting name="SSCEDataFile" serializeAs="String">                <value>C:\SCUP_2011\5.00.1727.0000\scupdb.sdf</value>            </setting>        </Scup.Properties.Settings> </applicationSettings> Save the config file Move the existing SCUPDB.SDF (in the above path) to the new path Finished! All

Lync 2013 - Cannot find any suitable disk for database files

Image
When you install a Microsoft Lync 2013 Server and you become the following message in Step 2 "Setup or Remove Lync Server Components"... Error: An error occurred: "Microsoft.Rtc.Management.Deployment.DeploymentException" "Cannot find any suitable disks for database files. You must manually specify database paths." ... is the solution very simple. Expand your system drive space or clean it. The cause of this error was lack of free disk space on the C:\ drive. You still need 16 GB of free disk space on the system drive.

How to give a user rights for NetScaler Reporting tab

Image
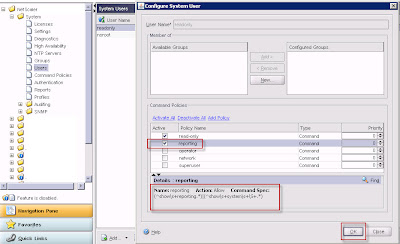
When you create a NetScaler user with read only rights, that user can't see the Reporting tab. You have the error message: Error retrieving the data source. Return code = 2138. Error message = Not authorized to execute this command. You can create this rights for the user with the following points. Open NetScaler webinterface Log in with nsroot or a user with root rights Go to Configuration tab Open folder System Go to Command Policies Generate a new one with the Add -Button Give a name (Example: Reporting) Type the following text in the Command Spec ->  (^show\s+reporting.*)|(^show\s+system\s+\S+.*) Click Create Go to Users Open the user do you want give the reporting access Actived the reporting policy Click OK

How to fix the check box on RDWeb 2012 for use private computer

Image
It is hard when you use the RDWeb interface internally only and you must activated the checkbox " I am using a private computer that complies with my organization's security policy. " each time. Do you want to activated the checkbox by default, you must make the following points. Go to C:\Windows\Web\RDWeb\Pages\en-US or other language Open the file "Default.aspx" with admin rights Go to line 32 with the content " public bool bShowPublicCheckBox = false, bPrivateMode = false, bRTL = false; " Change the value from bPrivateMode from false to true Save Example:  public bool bShowPublicCheckBox = false, bPrivateMode = true, bRTL = false;

How to launch an external program inside an App-V 5.0 environment

Image
In the old App-V versions, you can make this with the command line parameter: sfttray.exe /exe App1.exe OSDFilePath\OSDFile.osd With App-V 5.0, you can make this with the the command line switch /appvve that apparently can be added to any executable to launch it inside a virtual environment. Example Start Application "App1.exe" in the virtual environment of the PackageID "714ccb17-20a9-4fc3-b635-146cba322ac0" with the VersionID "72e97ec0-165e-4180-870c-ed0e13125ab5". Please note the "_" between PackageID and VersionID! C:\App1.exe /appvve:714ccb17-20a9-4fc3-b635-146cba322ac0 _ 72e97ec0-165e-4180-870c-ed0e13125ab5 You can find the PackageID and the VersionID with the following PowerShell command: Open Powershell.exe (with admin rights) Import-Module AppVClient Get-AppVClientPackage -Name VApp1 You can find the PackageID (Example 714ccb17-20a9-4fc3-b635-146cba322ac0) And the VersionID (Example 72e97ec0-165e-4180-870c-ed0e13125ab5)

How to publish the remote desktop session servers to RDWeb under RDS 2012

You can find the setting for publishing the Remote Desktop Session Server Desktop under: Server Manager Remote Desktop Services Collections CollectionName Tasks Edit Properties General tab But you can not change this setting in this wizard! Under Windows Server 2012 RDS you can only publish Desktops or RemoteApps, but not both. :-( If you would like to bypass this limitation for session collections only, you may consider changing the following registry value on your Remote Desktop Connection Broker (RDCB): Open the Registry-Editor Go to the following path:  HKLM\SOFTWARE\Microsoft\Windows NT\CurrentVersion\Terminal Server\CentralPublishedResources\PublishedFarms\<collection>\RemoteDesktops\<collection> Open the REG_DWORD " ShowInPortal " Change the value data from 0 to 1 After this change you can see the desktop in RDWeb. :-)